

How Do You Draw An Owl
Drawing birds tin be tricky. Each kind of bird is dissimilar, from its color to its structure and size. When it comes to drawing owls, not every owl is the same either. From befouled owls to woodland owls, each i is unique. Owls take been the subject of mysticism for thousands of years, holding many different meanings for the different cultures beyond the globe. In light of this, information technology is no wonder that they have as well been the subject of many an artwork! If you accept been looking for a how-to guide on cartoon these majestic birds, we volition teach you how to draw an owl in this tutorial! Y'all will soon be able to primary this bird and include information technology in your works of art!
Table of Contents
- 1 Introducing the Mystical Owl
- 2 Step-by-Step Instructions for Owl Drawing
- ii.1 Step 1: Constructing the Owl's Trunk
- 2.2 Footstep two: Constructing the Owl'due south Head
- 2.three Step 3: Constructing the Owl'due south Wing
- 2.4 Step 4: Amalgam the Owl's Legs
- ii.5 Step 5: Constructing the Owl'due south Talons
- 2.6 Stride 6: The Owl'southward Face Structure
- 2.7 Step 7: Calculation the Eyes and the Beak
- 2.eight Pace 8: Adding an Outline to Your Owl
- 2.ix Step 9: Detailing the Owl with Feathers
- 2.x Step 10: Adding Life to the Owl'due south Eyes
- two.11 Step 11: Give It a Stump to Stand On
- 2.12 Footstep 12: Shading and Blending
- iii Frequently Asked Questions
- 3.i Will This Tutorial Explain How to Draw an Owl?
- 3.2 Are Construction Lines Necessary for Owl Drawing?
- iii.3 How Long Will This Owl Drawing Take?
- 3.4 Are At that place Any Extra Tools or Materials Needed for This Owl Drawing Tutorial?
Introducing the Mystical Owl
For most people in the mod age, owls, along with their haughty hoots, bring wonder to the world. Throughout history, owls have had a myriad of symbolism. For some African cultures they were, and yet are, omens of inconvenient circumstances, like death. Others, like native American tribes, believe the owl to be a guide to the afterlife. Many others come across the owl equally a bad omen. The Greeks believe owls to be their protector, blessed with a divine light that enables them to see in the dark. In fact, the Greeks would have an owl fly over their troops before they fought to bring well-nigh victory.
In total, there are 216 different kinds of owl species, which can be separate up into ii subcategories: truthful owls and befouled owls. True owls have big, circular faces and a beautiful, speckled collection of feathers. The moving picture below is a true owl, specifically the barking owl.

Step-past-Step Instructions for Owl Drawing
Now that we have established merely how interesting these creatures are, we can dive right into the tutorial for how to draw owls. Play your favorite movie featuring an owl, perhaps Legend of the Guardians or one of the Harry Potter films. If your fine art station is not nigh a television, some soft music in the background and a few snacks at hand will be but as good to go along you company.
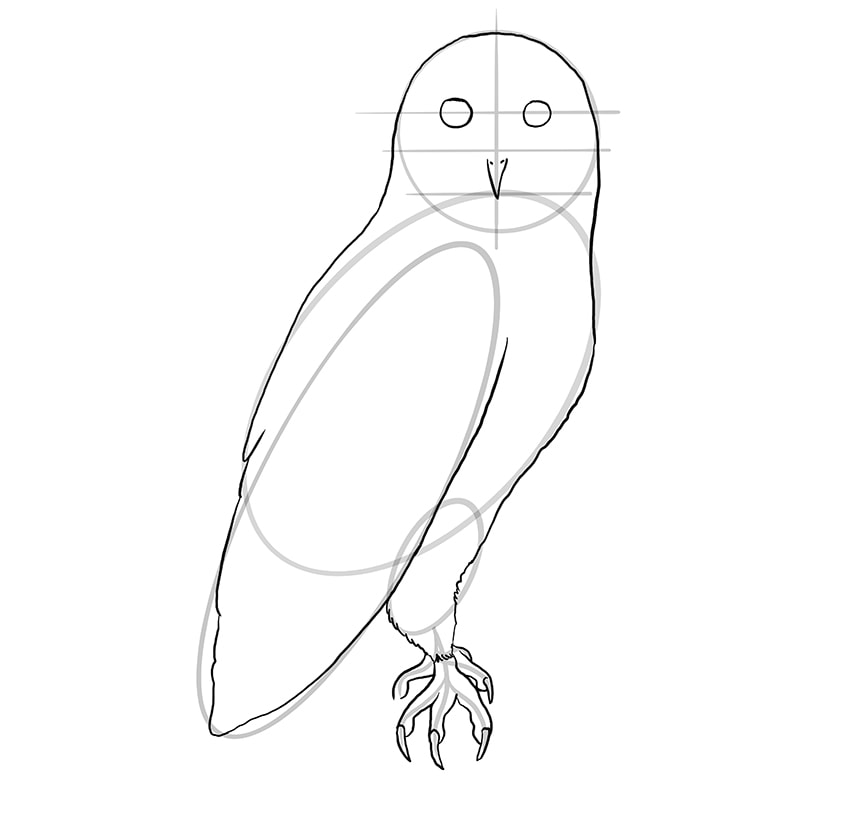
Step 1: Amalgam the Owl'due south Body
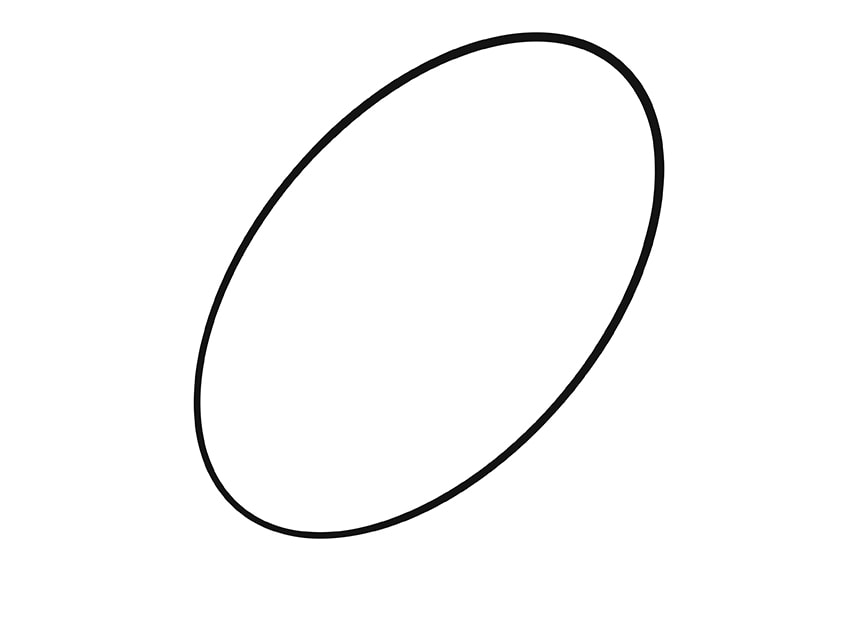
As with all our drawing tutorials, nosotros volition ever guide you with the use of structure lines and shapes. These must be drawn using a 4H to 6H pencil, considering they demand to be light and easily erased. The body's structure is a very simple pace. Yous must draw an oval in the middle of your page, making sure that at that place is space for added detail effectually information technology.
The oval you depict should be fairly large because it will exist a representation of the unabridged body. It should also lean quite heavily to the correct.
Step ii: Constructing the Owl's Caput
The owl's head is a very interesting thing indeed. An owl appears to take no neck, and they tin hinge their heads to 360 degrees without blinking an heart! For the structure of your owl drawing'southward caput, we inquire you to describe a circumvolve that crosses over the pinnacle of the oval you drew in the first step. The size of this circle is of import – information technology should be only a little bit smaller than half the length of the oval.

Step iii: Constructing the Owl'southward Wing
This role might seem to be quite catchy at offset, but if you follow our instructions, yous will manage this perfectly. The wing'south construction shape is an oval, merely more elongated than the starting time oval you drew for the body. It should be narrow enough to fit inside the starting time oval with space on either side, and it should stick out below the torso's construction oval.
Yous might showtime to see the hint of an abstract owl after this step – run into our example beneath equally a reference.

Footstep 4: Constructing the Owl's Legs
This step might be slightly deceiving, just it offers the best guidance in getting the proportions of your owl drawing's legs right. Another oval is needed for this, and yous must place it at the bottom of the body's oval (to the correct of the wing). The left-hand side of the leg's construction oval should link up with the intersection point where the wing and body ovals meet. The top of the leg'south construction oval should sit in-betwixt the right-hand side of the wing and the rest of the torso'due south oval.

Step 5: Constructing the Owl's Talons
Our tutorial is about how to draw owls realistically, which ways that our owl drawing should have the correct number of toes and talons. Our drawing will but evidence three of the owl's toes, only there is unremarkably a fourth toe that comes out from the back of the owl's foot, significant that information technology is often subconscious from sight. One of the legs is hidden behind the other, which means that for now, it volition await similar the toes are coming out from the aforementioned foot.
When you start to add together detail, the depth will make everything articulate.
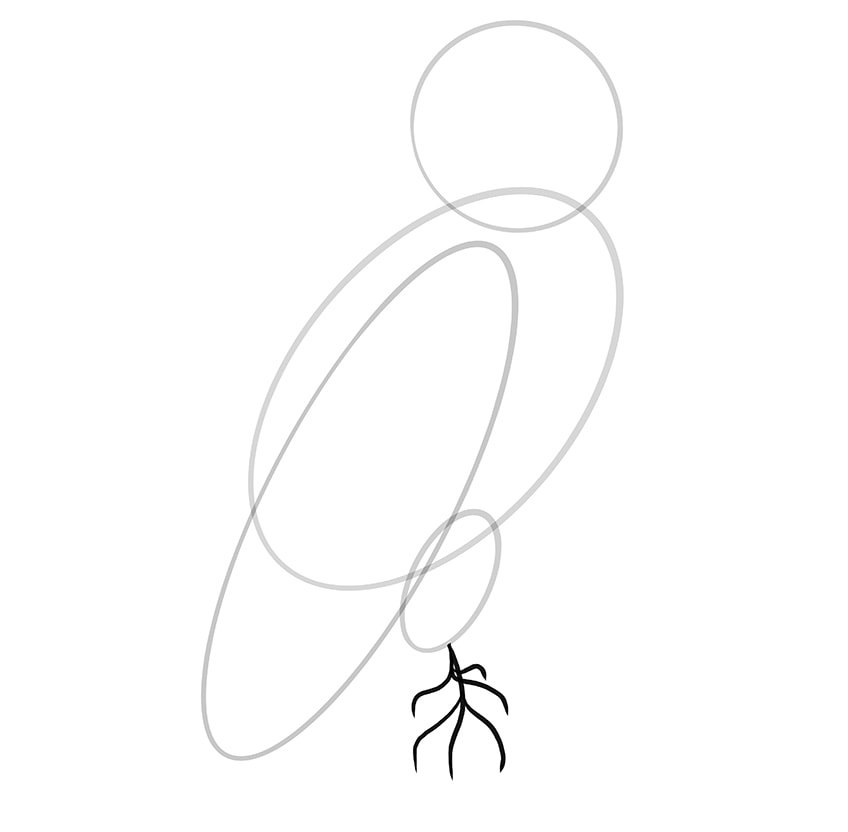
Start cartoon the construction lines for the toes of the front foot by drawing a curved line extending to just below the fly's construction oval. It should start right at the bottom of the oval, on the right-manus side. Next, yous must add together ii smaller curvy lines forking out from the line you just drew, both ending at the aforementioned point.
For the pes behind the one you only drew, draw another line coming out from the same signal as the first foot'south primary line, and make it bend out to the left, towards the wing. Add two more than toes reaching out to the correct, crossing the line of the first foot.
Imagine that the owl is clinging to a tree stump, which means that the talons will bend inwards slightly.
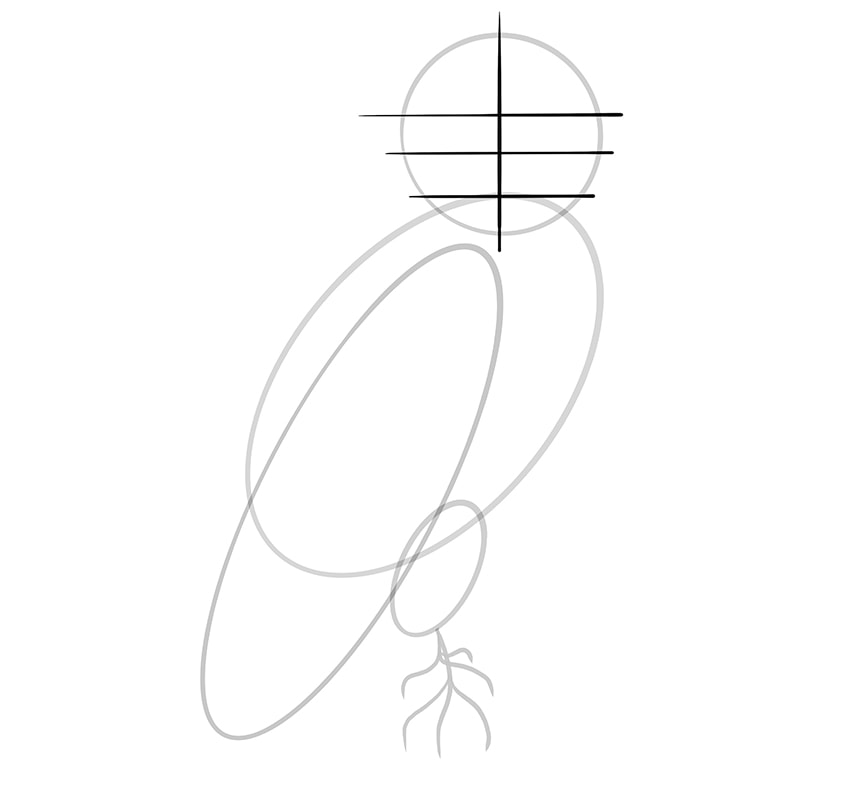
Stride 6: The Owl's Face up Construction
If you lot have always drawn a face using structure lines, you will know that the best way to do it is past dividing the confront into parts. This ensures maximum symmetry which, for an owl cartoon, is of paramount importance.
Start past drawing a line that runs vertically through the eye of the owl's face. If you measure the line yous just drew, find the point that is just in a higher place the halfway point and draw a line that runs horizontally through the circumvolve. Your adjacent horizontal line must sit down on the top of the body's oval, and the last one should be simply over the halfway betoken, between the other two horizontal lines.
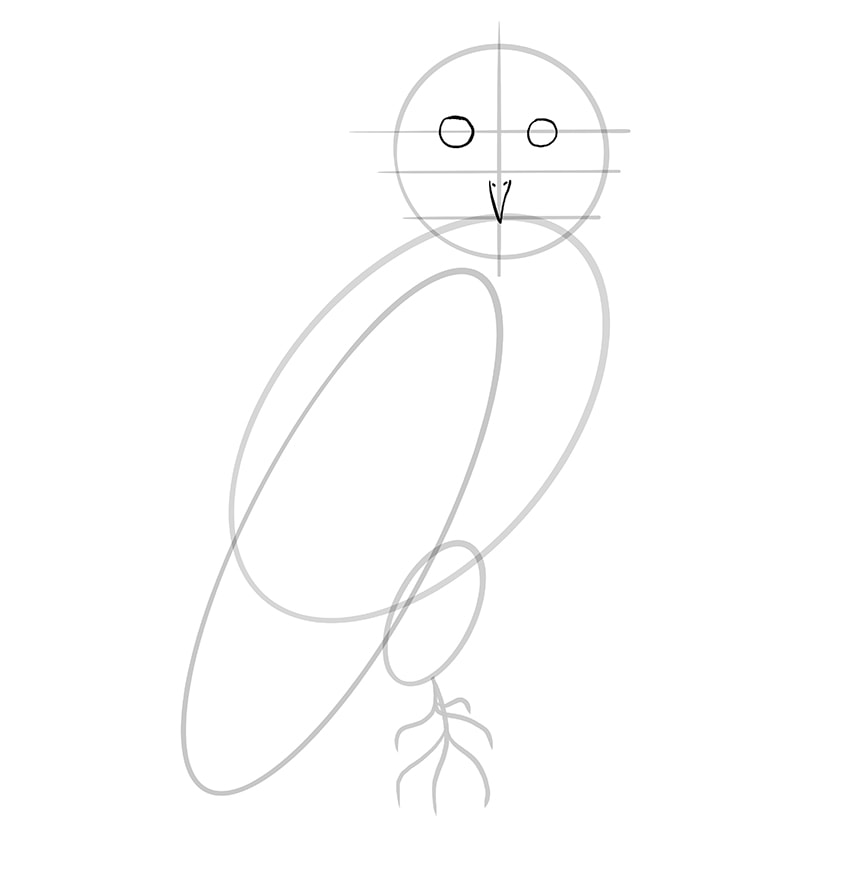
Step seven: Calculation the Eyes and the Beak
This pace will make use of the vertical line you drew in the previous step. Draw a small circumvolve on either side of the line, ensuring that each circle crosses over halfway (although placed closer to the line than in the middle). Next, you must draw the owl's bill, which will exist in the shape of a "5". Permit the bottom point of the "5" shape starting time from the lesser horizontal line. The sides of the "V" should extend until merely below the middle horizontal line. Draw ii lilliputian dots for the beak's nostrils at the aforementioned points at which the "V" ends.
Step 8: Calculation an Outline to Your Owl
For this office, we demand to remind you that the construction lines are only at that place to guide your pencil, and as such, they should be followed loosely. Start from the heart horizontal symmetry line of the owl's face (on your right) and describe a continuous line that goes up and left, following the shape of the circle until the other side of the head or heart symmetry line. At that place, you must curve the line out slightly, getting your pencil to gracefully link up with the body's construction oval.
From in that location, you must now follow the wing'due south construction oval down to the end of it, making it more than pointed, and then go on following the wing's shape until nigh iii quarters into the oval for the trunk.
You tin now return to the middle horizontal symmetry line to draw the right side of the owl's body. Draw the outline going down and outwards, but simply slightly, and permit the line meet up with the correct-mitt side of the body'southward construction oval. Continue following the oval's shape until yous get virtually halfway through the leg'due south structure oval. Let the line bend in slightly to the left of this oval and and so go downwards from there.
When you first with the legs, your outline must forgo the directly line and prefer a more than feathery look. This can be done by drawing short little lines with loops that are either U- or V-shaped. Earlier you draw the feet, make sure that y'all have drawn a feathery line that indicates where the leg stops and the pes starts.
The toes tin can be outlined by drawing lines that run around each of the structure lines yous drew in footstep 5, ensuring that you don't forget to extend the lines to the talons. Make the toes curve out slightly before they connect with the talons to show how they are pressed into the stump the owl is clinging to.
Step ix: Detailing the Owl with Feathers
We are aware that the difference is quite vast betwixt the example in a higher place and the example nosotros take for this stride. Y'all do not demand to be intimidated, however, considering our tutorial is designed for both beginners and avant-garde drawers, and so you lot will not struggle.
The feathering details added to the owl beneath were done with short lines that are drawn loosely.
Outset with the owl's face, and draw two rings of these piddling lines going in an outwards direction, ane just next to the outline of the caput and the other on the inside. These rings should be parallel to each other, with the inner ring being a bit smaller. You tin and so add some of the same lines effectually each middle and continue that design downwardly towards the beak, leaving the middle almost empty. This detailing tin can go on past the owl's beak until information technology blends with the two rings you made around the face.
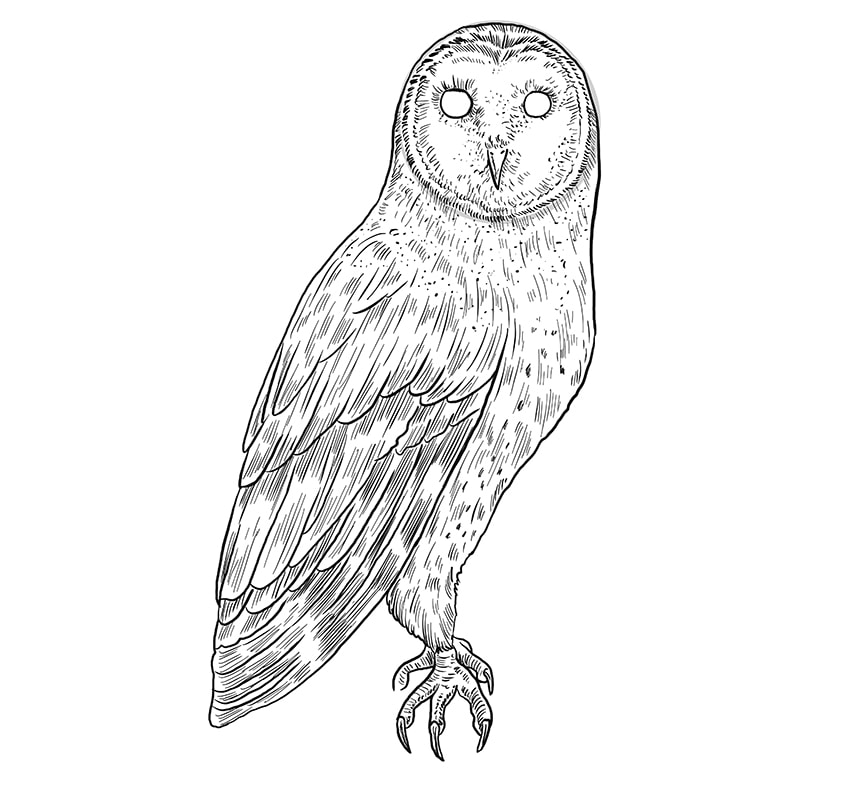
For the next phase of feathering, you can continue with the detailing lines, only at present with a mixture of long and short lines, as well every bit specks. These must go in a downwards direction, curving slightly with the shape of the owl's body. A good proffer would be to showtime at the lesser of the head, going from one side to the other, keeping with the rounded shape.
For the owl's wing, bigger feathers must exist added.
Do this by completing one row of feathers before you start with the adjacent. The feathers must be in the shape of an elongated "V" shape, but the point can exist slightly rounded and curved to the left on the correct-hand side of each feather. This will make it look like each feather overlaps the other. The feathers nearer to the bottom of the wing must be slightly longer and leaning to the left. You can then add a mixture of long and short detailing lines as y'all did with the body so equally to give a more realistic ruffle to the feathers.
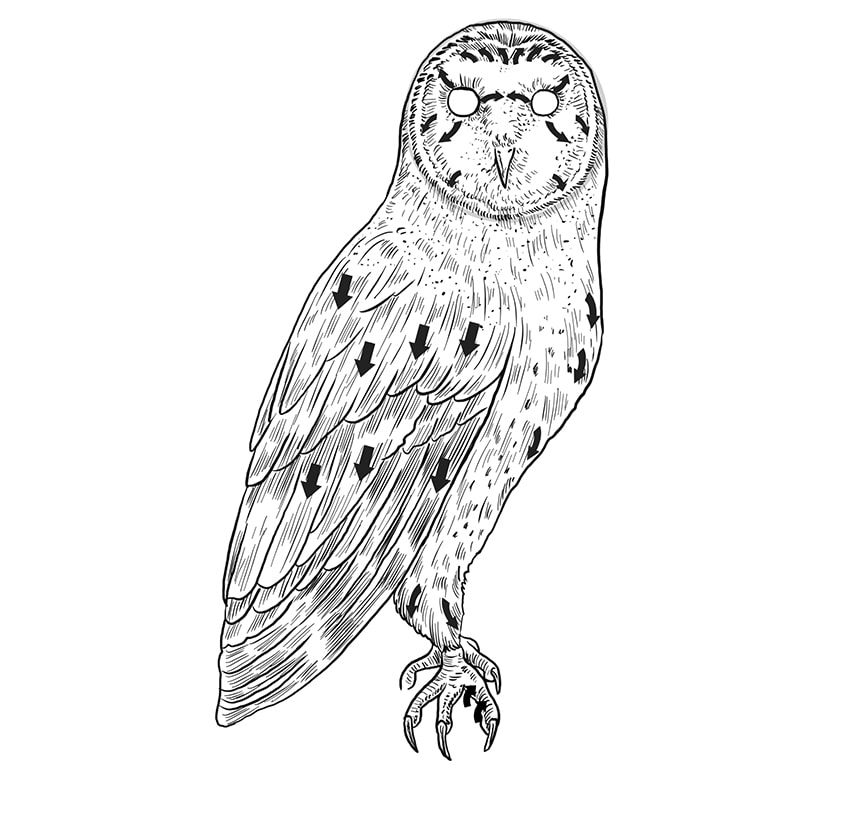
Step 10: Adding Life to the Owl'due south Eyes
An owl'southward optics are the nigh mysterious role almost them. They are large and glassy and seem to stare right into your soul. To replicate this effect, color them in black, leaving a perimeter gap uncolored so that information technology is white. The coloring should not be 100%, because you must leave some flecks of white to act equally reflections. In one of the optics – nosotros chose the left in our case – we added a slightly shaded patch of white to give it that glassy look.

Step 11: Give It a Stump to Stand On
We did mention earlier when yous were amalgam the owl's toes and talons that it will be perched on the stump of a tree. You lot can, of course, cull what it is standing on – it does non need to exist a tree stump specifically.
So, if y'all would similar to draw the owl perched on the arm of the Greek goddess Athena, for case, be our invitee. Simply make sure that the toes and talons look natural in their connectedness.
If you lot do describe the stump, draw a circle of sorts, with the line going behind the toes of the owl and standing going upward and effectually (yet backside) the owl's foot. This shows the surface of the stump. Draw some detailing lines going in a circular management for a real emphasis. So, draw a line coming down from the stump's surface and add together some detailing lines going in a downwards direction for the bark of the tree stump.
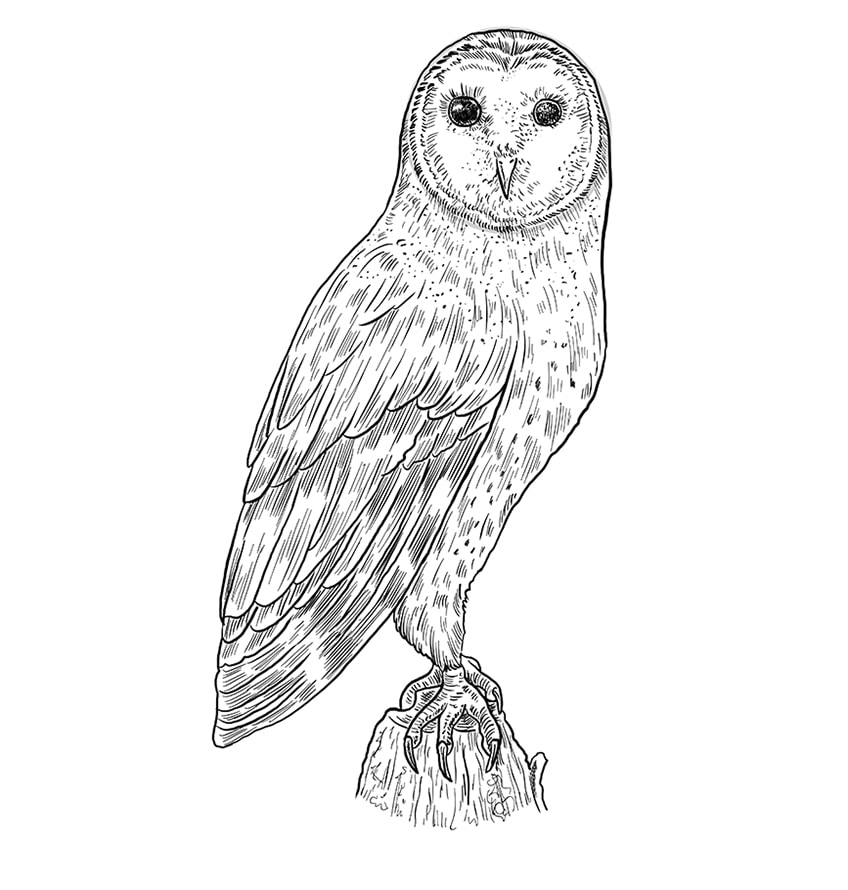
Footstep 12: Shading and Blending
This pace will truly bring your owl to life! Use an earbud if you have one handy, or simply apply your pencil and manually utilise the shading to your owl. Add extra shading on the wings, aiming for the bottom of each feather. Finish this step off by adding some shading to each fleck of the feather-detailing lines. For this owl, there is no shading required on the confront.
If you would like to go the extra mile with your owl drawing, you can too become out a white pencil and add some highlights to the feathers on the fly. This will make them look glossy, nearly as if they will spread out at whatsoever moment.

Nosotros salute yous for completing this owl drawing tutorial and we hope information technology was as satisfying for yous as it was for us. With this new skill you take gained, y'all can start learning to adapt these beautiful birds into your artworks whenever and withal you wish.
Ofttimes Asked Questions
Will This Tutorial Explain How to Draw an Owl?
The sole purpose of this tutorial is to teach you how to draw an owl realistically. So, yeah, this tutorial will explicate how.
Are Construction Lines Necessary for Owl Drawing?
The construction lines are just lightly fatigued, significant that they will not be there in your terminal product. They are necessary to assist you lot achieve the correct proportions for your owl drawing.
How Long Will This Owl Drawing Accept?
This is a quick tutorial that should accept you lot a maximum of half an hour. However, if you accept not drawn in a while or if you are new to this hobby, yous might take a bit longer.
The only tools you volition need are the option of medium you are drawing your picture with. Pencils, pens, crayons, or fifty-fifty your tablet. An eraser and some earbuds for blending might also exist handy.

Source: https://artincontext.org/how-to-draw-an-owl/
Posted by: santiagowareatur.blogspot.com
0 Response to "How Do You Draw An Owl"
Post a Comment