

How To Draw Anime Head
This tutorial explains how to depict a an anime or manga girl'south head head and face from the front and side views.

Earlier you begin drawing it's a good idea to outline the defining features of the anime way.
Most female anime characters tend to have big eyes, a small mouth, nose and chin and a fairly round face. The lips are usually either very lightly defined or not fatigued at all. The hair is usually drawn in clumps instead of individual strands and often tends to accept a somewhat spiky wait.
If drawing using pencil and paper be sure to make very low-cal lines for the initial parts of the tutorial as you will demand to erase some parts later.
If y'all would also like to try cartoon a more than realistic looking anime character cheque:
How to Describe a Realistic Anime Face Step by Pace
Stride i – Drawing The Caput
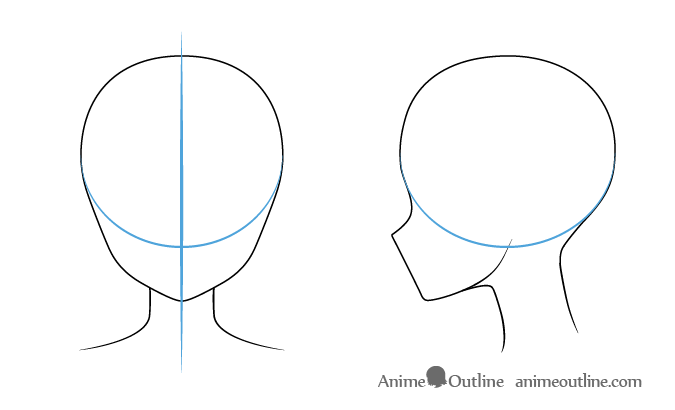
Star you cartoon with the overall outline of the head. For an explanation of the drawing gild also as some general drawing tips see:
Beginner Guide to Picking Colors When Drawing Anime & Manga
You lot can draw a vertical line down the middle of the caput for the front view to help you lot insure that both sides are even.
Make a circle or a light oval for the front view and a longer oval for the side view to assist you get the shape of the tiptop of the head.
For the front view you can basically project 2 sets of lines down from the oval/circle that curve to meet at the chin.
For the side view there volition be a sort of indent for the nose/optics expanse. Draw the nose virtually halfway between the bottom of the chin (covered in more item in Steps iii) and the middle of the caput. You can draw a direct line going from the tip of the nose down to the mentum (details of the mouth volition exist added in Stride five). Over again for the side view you tin can draw a line going upwards from the mentum and so curving again towards what will subsequently exist the position of the ears to form the lower jaw.
For both views draw the chin small and virtually pointy but with a tiny curve at the bottom.
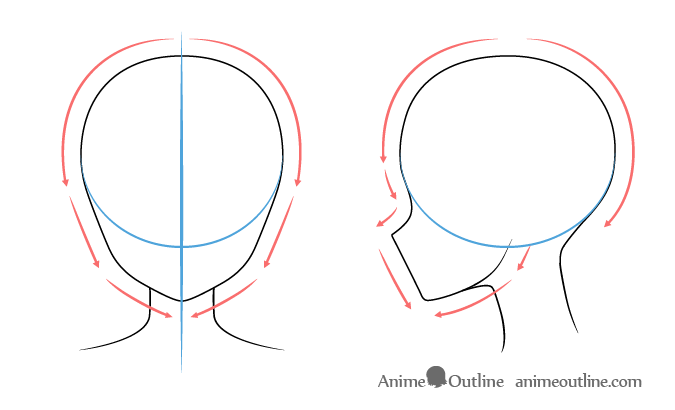
In the above example you can meet the basic curves and shape of an anime or manga way head.
Step 2 – Drawing the Ears
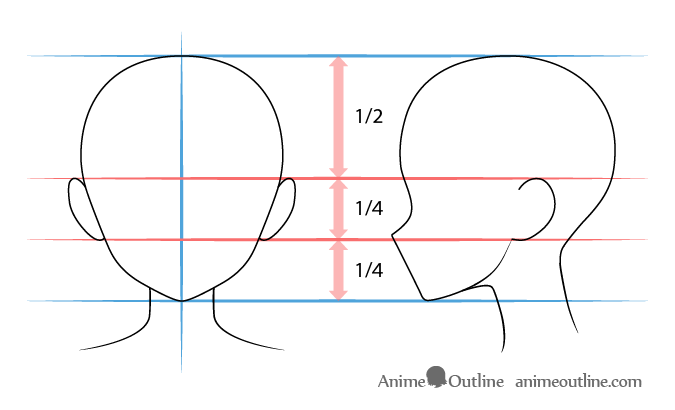
To place the ears first draw a horizontal line direct though the middle of the caput and and then draw another line between that and the chin. Draw the ears betwixt these 2 lines.
For the side view placement of the ears they will be positioned slightly more towards the back of the head than the front.
As the ears will be covered by the pilus in later on stride we won't go into drawing their inner details. Simply if you lot would like to larn more than almost drawing anime style ears come across:
- How to Draw Anime and Manga Ears
- How to Draw Anime Cat Girl Ears Step past Footstep
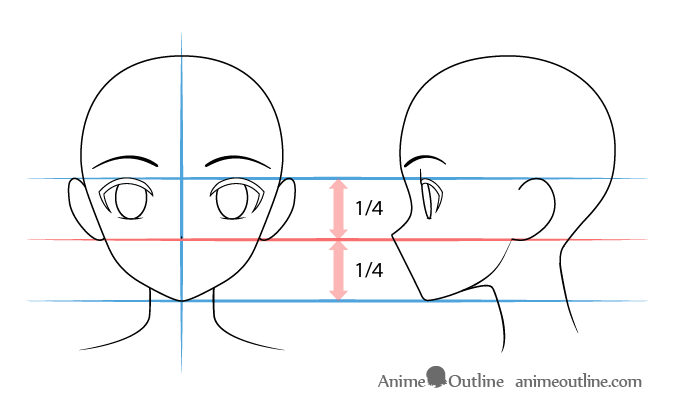
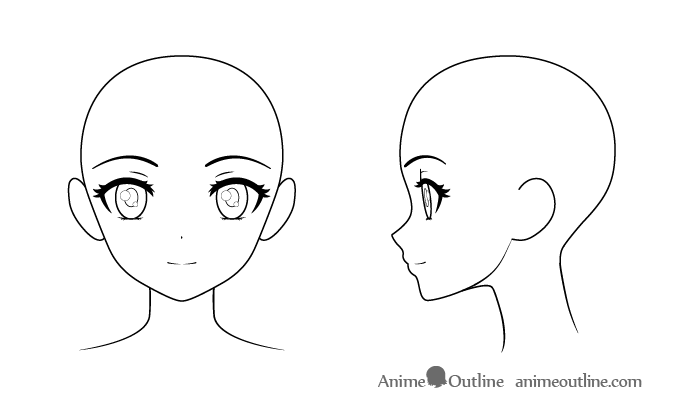
Step 3 – Drawing the Eyes
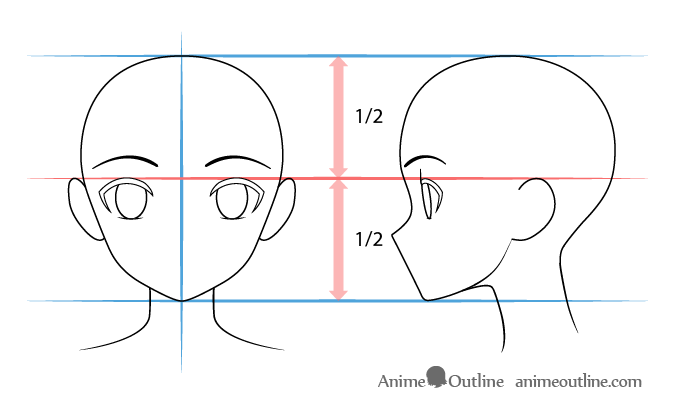
To place the eyes on the caput you can employ the same vertical line used to place the pinnacle role of the ears. Draw the eyes directly beneath this line. The peak of anime eyes can vary based on mode and character type so there is no one certain mode to place the bottom portion.
If cartoon both views at once be sure that the positioning of the lesser portions of the eyes in both views is relatively even. A mutual fault beginner artists tend to make when drawing the same face from unlike views is misaligned or differently sized facial features.
Also annotation that for this stage of the cartoon process you tin do a simplified shape of the eyes and leave the details for a later (covered in Step 7).
For more on drawing female anime see:
How to Draw Female Anime Eyes Tutorial
For cartoon different types of eyebrows see:
How to Draw Anime & Manga Eyebrows
Stride 4 – Drawing the Olfactory organ
As already mentioned y'all will want to position the nose between the horizontal halfway point of the face and the lesser of the chin.
In the front view you can pretty much describe the nose every bit only a dot in the side view an anime nose is unremarkably small and pointy.
For more than examples of anime noses in different views y'all can see:
How to Describe Anime and Manga Noses
Step 5 – Drawing the Mouth
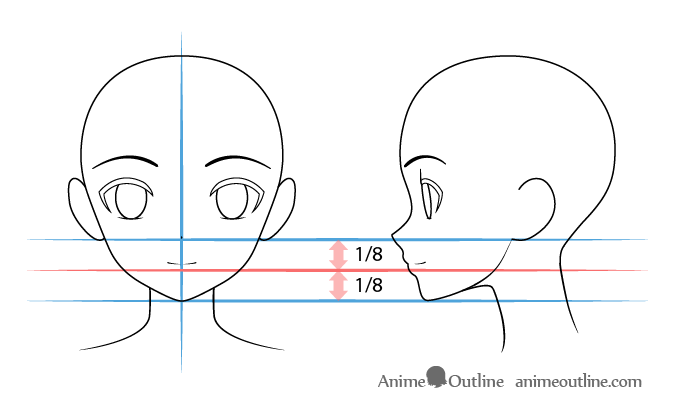
To oral cavity is a piddling scrap trickier to place every bit you will first want to get the position of the bottom lip in guild to practice information technology. As well go on in mind that when it comes to anime and manga the lesser lips itself is oftentimes not drawn in the forepart view of the characters.
The bottom lip will exist positioned betwixt the olfactory organ and the bottom of the chin. Draw the rima oris itself slightly above that.
You can pretty much describe the rima oris as ane or two lines (really just one line with a break in the center for the front end view). If you want a happier/friendlier looking graphic symbol you can describe it with a scrap of a curve.
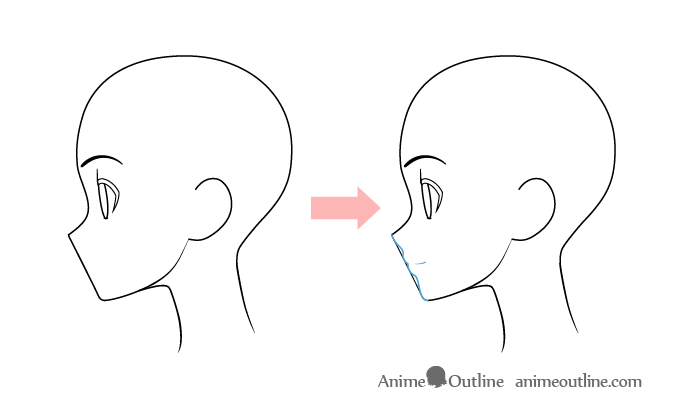
In the above illustration you can see how the initial directly line from the tip of the nose downwardly to the chin tin and then be used help you draw the lips.
For more on cartoon anime mouths and lips see:
- How to Draw Anime Mouths Tutorial
- How to Depict Anime Lips Tutorial
- How to Draw Anime and Manga Mouth Expressions
- How to Describe Anime & Manga Mouths – Side View
Step 6 – Cartoon The Pilus
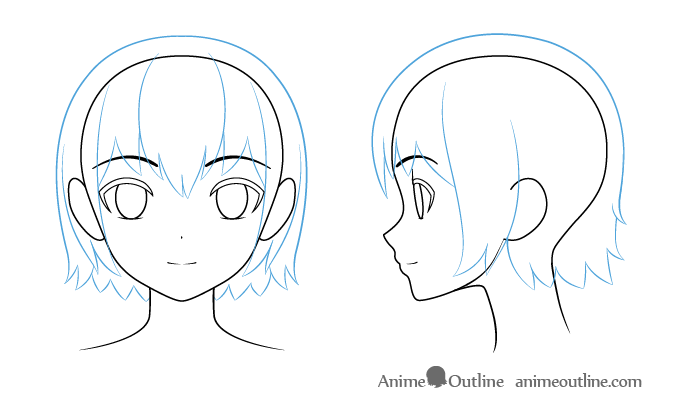
Add the hair.
Keep in mind that the hair volition overlap some of the other features of the graphic symbol'due south confront. But information technology is still practiced practice to depict those out especially since they may be visible if you cull to draw a different hair mode. You can erase the parts that are covered up past the hair once you are done.
For this stage you tin simply depict out the major parts of the pilus clumps without any of the smaller inner details of the hair. Endeavor and vary the clumps slightly in size shape and direction to give the hair a more than natural wait.
For more information on drawing anime and manga hair check:
- How to Describe Anime and Manga Pilus – Female person
- How to Draw Anime Pilus Blowing in Different Directions
- How to Draw Anime & Manga Male & Female Hair
- How to Depict Anime & Manga Way Hair Braids
- Different Ways to Draw Anime Hair Highlights
- How to Draw Wet Anime Hair Footstep by Step
Step 7 – Drawing the Smaller Details of the Confront & Finishing the Line Drawing
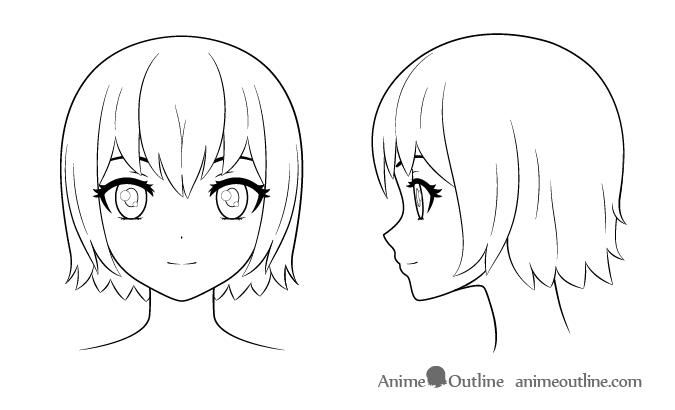
At this phase you can erase the parts of the face that are covered by the hair and add together the smaller details o the eyes such as the eyelashes, pupils, and highlights. You can also shade in the eyelashes and add some more than details to the hair.
When drawing the eyes yous can lightly outline the highlights (reflections of light) with a very calorie-free lines and so that if you shade the eyes y'all don't accidentally shade them in also.
One time you are done you should have a finished line cartoon of an anime daughter's head and face.
This is technically a finished drawing and you can exit it equally is but if you want to get a lilliputian bit further you can move on to the next step for the shading.
You can meet the finished line drawing of the facial features without the pilus in the way in the illustration higher up.
Footstep 8 – Applying Shading
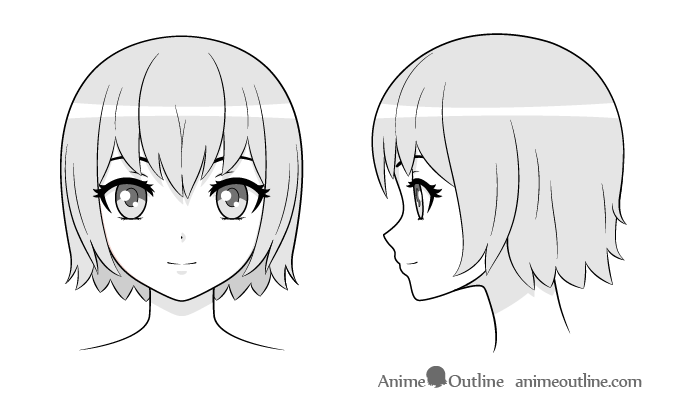
You lot can add some very basic shading to your drawing to arrive stand up out a lot more.
Anime uses what is known equally "Cel" way shading (basically shading with no gradients) which generally makes shading fair fast and easy.
The way the shading is applied will be adamant past 2 things. The areas that are naturally darker and the areas that have shadows cast on them.
Darker Areas
By and large you will want to darken the hair and the irises of the eyes (leave the highlights white). Shade the pupils and the upper area of the iris even darker.
For more than detailed examples of shading hair run into:
How to Shade Anime Hair Step by Step
Exit a white area in the hair for the highlight. For more on drawing these run into:
Different Ways to Draw Anime Pilus Highlights
In Shadow Areas
The way shadows are cast is determined by the low-cal source. For the sake of this tutorial we will get with very "generalized" lighting weather condition where the shadows are commonly cast downward.
In this case the shadows (elevation to bottom) volition be:
- Forehead – from the hair
- Eyelids – due to them being indented in the head (less light reaches)
- Peak of the Eyes – from the eyelashes (somewhat optional these tin can be also small to notice)
- Olfactory organ – to i side
- Below Mouth (optional) – from the lips
- Neck – from the head
For a tutorial on shading anime faces in unlike lighting weather condition come across:
How to Shade an Anime Face in Unlike Lighting
If yous would like to colour your character see:
- Beginner Guide to Picking Colors When Cartoon Anime & Manga
- How to Color an Anime Character Step by Step
Decision
This tutorial provides general guidelines for drawing an anime or manga mode female person confront. For instructions on cartoon anime style female bodies cheque out:
- How to Draw an Anime Daughter Body Step past Step Tutorial
- How to Draw Anime & Manga Artillery Tutorial
- How to Draw Female Anime Legs Tutorial
For drawing an older or younger female person character'southward head and face see:
- eight Pace Anime Woman's Head & Confront Drawing Tutorial
- How to Draw a Cute Anime Girl Footstep by Step
For drawing male person anime heads and faces encounter:
- How to Draw Anime and Manga Male Head and Face
- 8 Footstep Anime Male child'southward Head & Face Cartoon Tutorial
- 10 Step Anime Human'due south Face Cartoon Tutorial
For cartoon different types of anime characters see:
- How to Draw Anime Characters Tutorial
- How to Draw a Beautiful Anime Girl Step by Step

Source: https://www.animeoutline.com/how-to-draw-anime-girl-head-and-face/
Posted by: santiagowareatur.blogspot.com
0 Response to "How To Draw Anime Head"
Post a Comment